The Smart Object Replace node is a powerful automation tool designed specifically for mockup creators and print-on-demand sellers.
Instead of opening a file, finding the Smart Object, double-clicking it, placing an image, resizing it, and saving the Smart Object—this node handles the entire process automatically.
Important Concept: Unlike most Action nodes, the Smart Object Replace node acts as its own “Loop” (similar to a For Each node). It processes a whole folder of images on its own and does not need a For Each node connected before it.
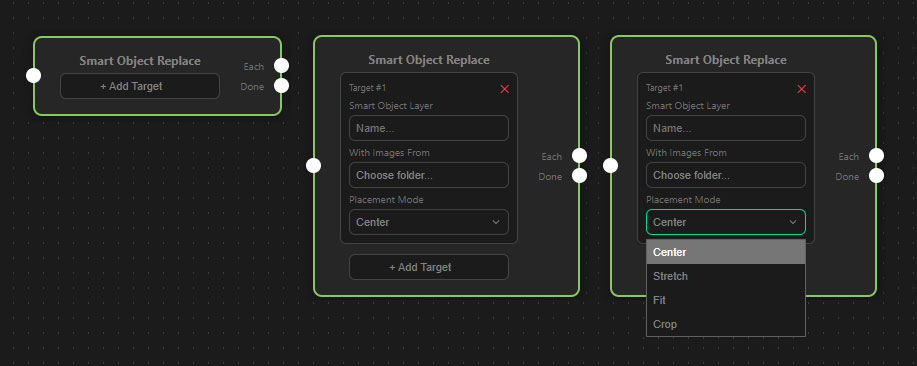
Configuring Targets
You can configure the node to replace one or multiple Smart Objects simultaneously within your active Photoshop document. Click “+ Add Target” to add a new replacement rule.
For each target, you must define:
- Smart Object Layer: Type the exact name of the Smart Object layer as it appears in your Photoshop Layers panel (e.g., “Design Here” or “Front Print”). The node will search through all layers and groups to find it.
- With Images From: Click “Choose folder…” to select the directory on your computer containing the new designs (JPG, PNG, TIFF, PSD, or WebP) that should be placed into this Smart Object.
Placement Modes
When the new image is placed inside the Smart Object, you can dictate how it should be resized to fit the canvas:
- Center: Places the image exactly in the middle without changing its original size.
- Fit: Scales the image so that the entire design is visible within the Smart Object bounds (may leave empty borders).
- Crop: Scales the image so that it completely fills the Smart Object bounds, cropping off any excess area.
- Stretch: Forces the image to the exact width and height of the Smart Object, disregarding its original proportions.
Understanding the Ports (Connections)
Because this node processes a whole folder of images, it features two output ports:
- Input Port (Left): Connect this to a node that opens your mockup file (e.g., Open Document).
- The “Each” Port (Top Right): Connect this to actions you want to perform after every single replacement (usually a Save Document node followed by a Close Document node).
- The “Done” Port (Bottom Right): Connect this to actions that should only happen after the entire folder of designs has been processed.
Smart Feature: If the node is triggered but cannot find the specified Smart Object layer in the current document, it will simply skip the file and proceed to the “Done” port without causing an error.