Think of the For Each node as a pointing finger. It does not open or edit files by itself. Instead, it simply points to a list of items (like files in a folder or layers in a document), one after the other.
You always need a “pointer” node like this first, before you can tell Photoshop to actually open the documents using an Open Document node.
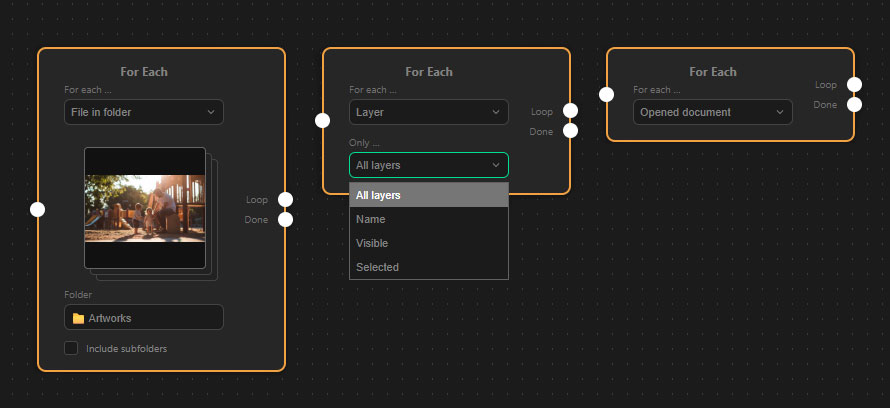
Loop Targets
You can choose exactly what the node should point at:
- File in folder: Points to images inside a folder you select on your computer.
- Include subfolders: Check this box if you also want to point to images hidden in nested folders.
- Note on file types: The node is smart and only targets image files. It specifically looks for:
jpg,jpeg,png,tif,tiff,psd,psb, andwebp. Other files or hidden system files will be safely ignored.
- Layer: Points to layers inside your currently active Photoshop document.
- Filters: You can refine your target by choosing to loop through All layers, only Visible layers, currently Selected layers, or filter them specifically by Name (e.g., name contains “logo”).
- Opened document: Points to all the image tabs you currently have open in Photoshop.
Understanding the Ports (Connections)
Unlike basic nodes, the For Each node has two output ports on the right side. It is crucial to connect them correctly:
- The “Loop” Port (Top Right): Connect this port to the start of the action sequence you want to repeat (usually an
Open Documentnode). The plugin will run this chain for every single item the node points to. Important: If you want to close the images after processing, theClose Documentnode belongs at the end of this chain so it runs for every file. - The “Done” Port (Bottom Right): Connect this port to the next major step in your workflow that should only happen after the entire batch is completely finished. For example, you could connect a second
For Eachloop here to start a completely different task once the first folder is processed.
Visual Preview
When you use the “File in folder” target, the For Each node provides a helpful Visual Stack Preview. It displays a small thumbnail of the images inside the chosen folder directly on the node, so you always know you are pointing at the right directory. If the folder contains no supported images, it will display a “No images in folder” message.