The Align & Position node allows you to precisely position your currently active layers within the Photoshop document canvas.
Instead of manually calculating pixel coordinates, this node provides an intuitive 9-point grid and smart padding options to align elements—perfect for placing logos in corners or centering designs.
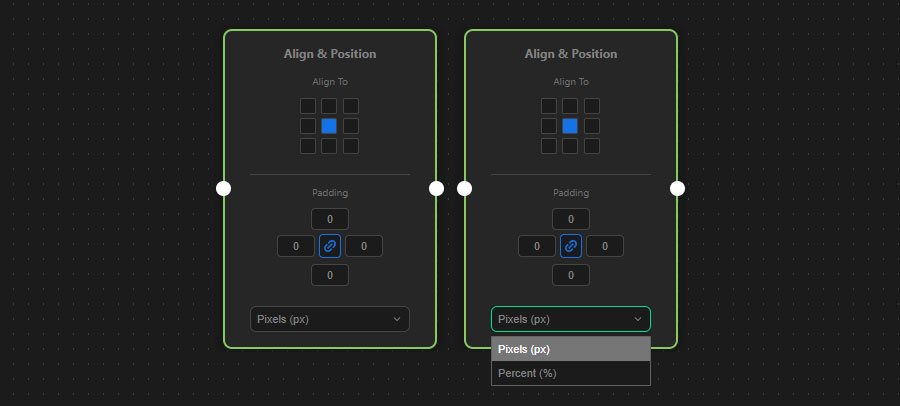
Alignment Grid (Anchor)
The 9-point grid represents your document canvas. Clicking a dot tells the node where the layer should be moved.
- For example, clicking the top-right dot will move your layer so its top-right corner perfectly touches the top-right corner of the document.
- Clicking the center dot will perfectly center the layer both vertically and horizontally.
- Note: The node is smart enough to use the layer’s “true bounds” (ignoring drop shadows or glow effects) to ensure pixel-perfect alignment against the canvas edges.
Smart Padding (Offset)
Often, you don’t want a logo to stick exactly to the edge of the canvas; you want some breathing room. This is where padding comes in.
You can enter positive or negative values for Top, Right, Bottom, and Left padding.
- Edges: If you align a layer to the top-left corner and set the Top and Left padding to
50, the layer will be pushed exactly 50 units away from those edges. - Center: If the layer is centered, the padding acts as an offset. For example, a Bottom padding of
100will push the centered layer 100 units up from the true center. - Link Icon: Click the chain icon in the middle of the padding inputs to link all four values together. Typing a number in one box will automatically apply it to all sides.
Unit Selection
You can choose how the node interprets your padding values:
- Pixels (px): Moves the layer by an exact number of pixels.
- Percent (%): Moves the layer based on the total width or height of the document. For example,
10%Left padding on a 1000px wide document will offset the layer by 100 pixels.
How to connect it
- Input Port (Left): Connect this to a node that ensures a layer is actively selected in your document (like Select Layers or Place Image).
- Output Port (Right): Connect this to your next processing step (e.g., a Transform or Save Document node).