The ezActions interface is designed to be clean and intuitive, following the dark aesthetic of Adobe Photoshop.
1. The Workflow Manager (Overview)
When you first open the plugin, you see the Workflow Manager.
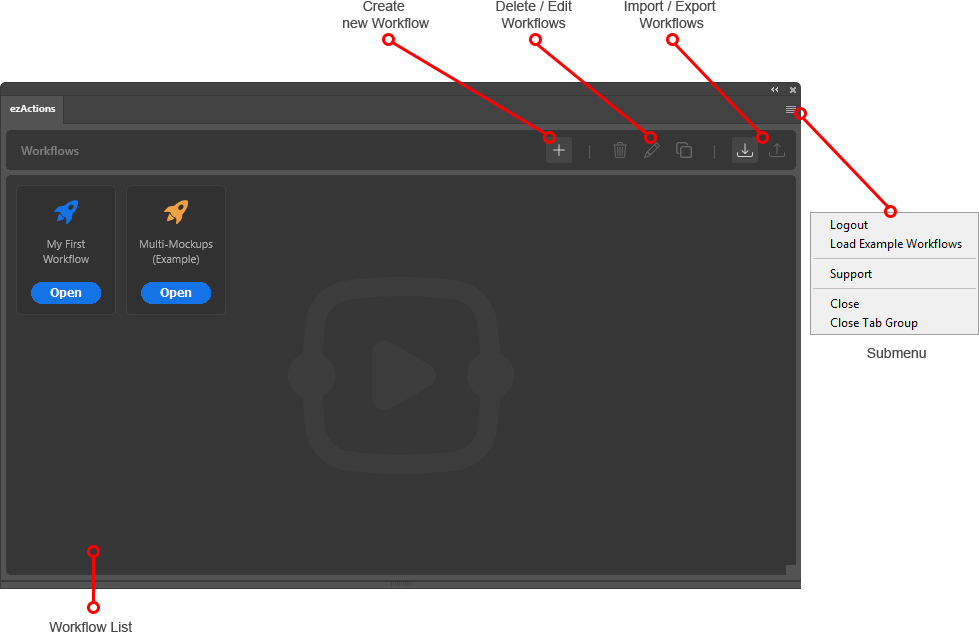
- Workflow List: All your saved automation sequences are listed here.
- Top Bar Actions: Use the buttons at the top to create a new workflow, or to delete, rename, and duplicate existing ones.
- Import/Export: You can share your workflows or backup your creations using the Import and Export icons.
The Settings Menu (Flyout Menu)
In the top right corner of the plugin, you will find a small menu icon (three lines or a gear). This Flyout Menu contains essential account and learning tools:
- Load Examples: If you are new to ezActions, use this function to instantly load a set of pre-built workflows. These examples demonstrate how to use nodes like
Smart Object ReplaceorIf-Conditionseffectively. - Logout: If you need to switch accounts or deactivate the plugin on your current machine, click Logout. This will clear your license data and return you to the login screen.
2. The Visual Editor
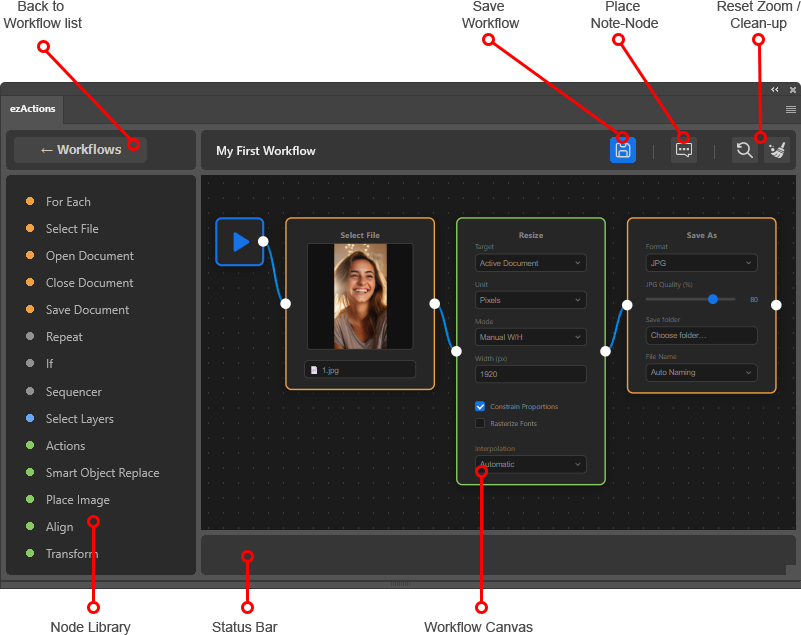
The Visual Editor is the heart of ezActions. This is where you build, customize, and manage your automation workflows by connecting different blocks called “Nodes.”
1. The Canvas (Your Workspace)
The large central area is the Canvas.
- Adding Nodes: Simply click on any node in the Node Library (sidebar) to instantly spawn it onto your canvas.
- Connecting Nodes: Click and drag from a node’s output port (right side) to another node’s input port (left side) to define the flow of your automation.
- Navigation: You can move around the canvas and zoom in or out to keep track of larger workflows.
2. The Node Library (Sidebar)
On the left side, you find the Node Library. It contains all available building blocks categorized for easy access:
- File: Tools for opening, saving, or looping through files and folders.
- Logic: Blocks like “If”, “Repeat”, or “Sequencer” to control the flow of your tasks.
- Actions: Core Photoshop tasks like “Transform”, “Align”, and “Smart Object Replace”.
3. The Toolbar (Top Navigation)
The bar at the top provides essential controls for your current session:
- Back to Workflows: Returns you to the main workflow list.
- Save (Blue Icon): Crucial! If the floppy disk icon turns blue, you have unsaved changes. Click it to save your work.
- Cleanup Layout: One click to automatically organize all your nodes into a neat, readable structure.
- Move Canvas: Click anywhere on the empty canvas background and drag to move your view.
- Zooming: Hold Ctrl (Windows) or Cmd (Mac) and use your Mouse Wheel to zoom in or out.
- Zoom Reset: Use the dedicated icon in the Toolbar to instantly return to 100%.
4. The Status Bar (Real-time Feedback)
Located at the very bottom of the window, the Status Bar keeps you informed:
- Progress Updates: Shows what the plugin is currently doing (e.g., “Opening file…”, “Processing Layer…”).
- Error Alerts: If something goes wrong, a detailed error message will appear here in red to help you troubleshoot the specific node that failed.